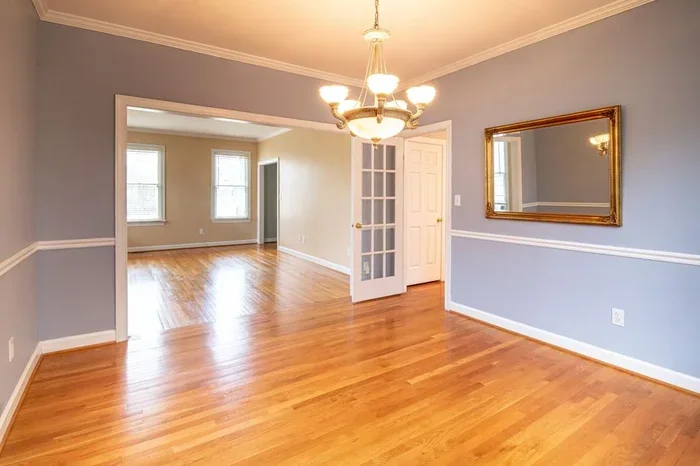
Stunning Living Room Wall Moulding Ideas and Inspiration
Living room wall moulding is a powerful design element that adds depth, character, and elegance to any room. From crown moulding to wainscoting, the right trim can completely change how a space feels. This guide covers styles, materials, installation tips, and inspiration to help you choose the perfect look for your home.
Living room wall moulding is one of the simplest and most effective ways to upgrade your home’s interior. Whether you are renovating an existing space or building from scratch, adding trim to your walls creates a sense of depth and sophistication. It frames your walls, highlights architectural features, and ties the entire room together. In this guide, we will walk you through everything you need to know about choosing, installing, and styling wall moulding in your living room.
## What Is Living Room Wall Moulding?
Wall moulding refers to decorative strips of material attached to walls. It serves both a functional and aesthetic purpose. Functionally, it protects walls from damage and hides gaps between walls and ceilings. Aesthetically, it adds character, texture, and visual interest to a plain surface.
There are many types of wall moulding. Each style brings a different vibe to a room. Some are formal and classic. Others are modern and minimalist. The beauty of moulding is that it works in almost any design style.
### Why Wall Moulding Matters
Wall moulding can make a small room feel larger. It draws the eye upward and creates the illusion of height. It also adds value to your home. Buyers love homes with well-finished architectural details. A room with decorative trim feels intentional and polished. Without it, walls can look flat and unfinished.
## Types of Wall Moulding Styles
There are several popular styles of wall moulding to consider. Each one offers a unique look and feel. Let us explore the most common options.
### Crown Moulding
Crown moulding sits at the junction between the wall and the ceiling. It is perhaps the most recognized type of trim. Crown moulding adds an elegant, finished look to any room. It comes in many profiles, from simple and understated to highly detailed and ornate.
For a modern living room, choose a slim, clean-lined crown. For a more traditional aesthetic, go with a larger, sculpted profile. Crown moulding works beautifully in rooms with high ceilings. It draws the eye upward and makes the space feel grand.
### Chair Rail and Dado Rail
A chair rail is a horizontal strip of moulding placed partway up the wall. It traditionally protects walls from furniture damage. Today, it is used mostly for decorative purposes. Chair rails create a natural dividing line on a wall.
You can use a chair rail to separate two different wall treatments. For example, you might paint the lower half of the wall a bold color and keep the upper half neutral. This technique adds visual depth and dimension. A chair rail also works well with wainscoting below it.
### Wainscoting
Wainscoting refers to panels that cover the lower portion of a wall. It is one of the most popular wall treatments for living rooms. Wainscoting adds texture and warmth to a space. It can be made from wood, MDF, or even PVC.
There are several types of wainscoting. Raised panel wainscoting looks formal and classic. Flat panel wainscoting suits a more contemporary style. Shiplap wainscoting has become very popular in recent years for its rustic charm. You can find wainscoting ideas on many home design websites, including aesthetic living room ideas that showcase this style beautifully.
### Picture Rail Moulding
A picture rail is a thin horizontal moulding mounted near the top of the wall. It allows you to hang artwork and photos without damaging the wall. You simply hang pictures from the rail using hooks and wire.
Picture rails are great for renters or anyone who likes to change wall art frequently. They keep walls clean and unblemished. This style is especially popular in period homes and traditional interiors.
### Baseboards and Skirting
Baseboards, also called skirting boards, run along the bottom of the wall where it meets the floor. They cover the gap between the wall and the flooring. Baseboards protect walls from kicks, vacuum cleaners, and general wear and tear.
While baseboards might seem like a small detail, they have a big impact on a room’s overall look. Taller baseboards make a room feel more substantial. Thinner baseboards work better in smaller spaces. You can learn more about styling baseboards and other wall elements by visiting how to style open shelves in your living room for related interior design tips.
## How to Choose the Right Moulding for Your Space
Choosing the right wall moulding depends on several factors. The size of your room, your ceiling height, and your personal style all play a role. Here is how to make the best choice.
### Consider Your Room Size
In a small living room, go with simpler, narrower moulding profiles. Large, ornate crown moulding can overwhelm a compact space. Slim wall trim adds a touch of elegance without making the room feel cramped.
In a large room with high ceilings, you have more freedom. Bigger, more detailed moulding pieces work well here. They fill the visual space and create a sense of balance. A large crown moulding can make a grand room feel even more impressive.
### Match Your Style
Your moulding should complement your overall room design. Here is a quick guide:
- Modern style: Choose clean lines, slim profiles, and minimal ornamentation.
- Traditional style: Go for detailed, carved profiles with a classic finish.
- Farmhouse style: Shiplap and simple chair rails work perfectly.
- Coastal style: Light-colored, natural wood moulding adds warmth.
- Industrial style: Consider pairing moulding with exposed brick or concrete accents. You can explore industrial living room furniture for a cohesive look.
### Choose the Right Material
The material you choose affects both the look and the durability of your moulding. Here are the most common options:
- Wood: Classic and timeless. Wood moulding can be painted or stained. It is durable but can be expensive.
- MDF (Medium Density Fibreboard): Affordable and smooth. MDF takes paint well. It is a great budget-friendly option.
- Polyurethane: Lightweight and easy to install. It resists moisture and is ideal for beginners.
- Plaster: Highly detailed and elegant. Plaster moulding is traditional and works well in older homes.
## Installation Tips for Living Room Wall Moulding
Installing wall moulding is a rewarding DIY project. With the right tools and a bit of patience, you can achieve professional-looking results. Here are some tips to help you along the way.
### Tools You Will Need
You will need a few basic tools before you start:
- Miter saw or miter box
- Measuring tape
- Stud finder
- Pin nailer or finish nails
- Wood glue
- Paint or stain
- Sandpaper
- Caulk and caulking gun
### Step-by-Step Installation
Follow these steps for a smooth installation process:
- Measure your walls: Start by measuring the length of each wall. Add a few extra inches for cuts and corners.
- Cut the moulding: Use a miter saw to cut pieces at the correct angles. For inside corners, cut at 45 degrees. For outside corners, also cut at 45 degrees but in the opposite direction.
- Attach the moulding: Apply wood glue to the back of the piece. Press it against the wall and secure it with finish nails. Use a stud finder to locate studs for extra support.
- Fill and sand: Fill any nail holes with wood filler. Once dry, sand the surface smooth.
- Prime and paint: Apply a coat of primer before painting. This ensures an even finish and helps the paint adhere better.
### Pro Tips for a Clean Finish
Always measure twice and cut once. Use painter’s tape to protect walls while painting. Apply caulk along seams and corners for a seamless look. If you are unsure about cutting angles, practice on scrap pieces first. For more detailed room styling advice, check out how to place furniture in your living room to create a cohesive design.
## Combining Moulding with Other Design Elements
Wall moulding does not have to stand alone. It works beautifully when combined with other design elements. This creates a layered, thoughtful look that elevates the entire room.
### Pair Moulding with Accent Pieces
Accent pieces like decorative mirrors, wall sconces, and framed art look stunning when framed by moulding. The trim draws attention to these pieces and gives them a gallery-like feel. Consider adding an accent chest for living room below a chair rail to create a cohesive look.
### Use Moulding to Define Zones
In open-plan living rooms, moulding can help define different zones. A chair rail or a change in wall treatment can separate a seating area from a dining area. This creates visual structure without closing off the space.
### Mix Moulding with Wall Shelves
Wall shelves and moulding are a natural pairing. Shelves mounted on a wall with surrounding moulding look intentional and polished. They add both storage and decoration. For shelf styling ideas, visit how to decorate shelves in your living room for practical inspiration.
## Common Mistakes to Avoid
Even with the best intentions, mistakes can happen. Here are some common pitfalls to watch out for.
- Choosing the wrong scale: Oversized moulding in a small room looks overwhelming. Undersized moulding in a large room looks lost. Always match the moulding size to your room proportions.
- Skipping primer: Painting moulding without primer leads to uneven coverage and peeling. Always prime first.
- Poor measurements: Rushing measurements leads to gaps and misaligned corners. Take your time and measure carefully.
- Ignoring the ceiling line: If your ceiling is uneven, your crown moulding will look crooked. Use a level and adjust as needed.
- Forgetting about the floor: Baseboards should align properly with the floor. Uneven floors require scribing the baseboard to fit snugly.
## Expert Insights on Living Room Wall Moulding
Interior designers agree that wall moulding is one of the most impactful and cost-effective upgrades you can make. According to design professionals, the key is to keep proportions in check. The moulding should complement the room, not compete with it.
Many designers also recommend painting moulding in a slightly different shade than the wall. A white or cream moulding against a bold wall color creates a beautiful contrast. Alternatively, painting the moulding the same color as the wall gives a subtle, integrated look. The choice depends on the mood you want to create.
When in doubt, less is often more. Simple, clean lines tend to stand the test of time better than overly ornate designs. Focus on quality materials and precise installation. A well-executed wall trim project can transform your living room for years to come.
## Conclusion
Living room wall moulding is a versatile and timeless design feature. It adds character, elegance, and value to your home. Whether you choose crown moulding, wainscoting, or a simple chair rail, the right trim can completely change the feel of a room. With the right materials, careful measurements, and a bit of patience, you can achieve beautiful results. Start with one wall or one style, and build from there. Your living room deserves this simple yet powerful upgrade.
Key Takeaways
- Wall moulding elevates your living room: It adds architectural interest and a polished, finished look to plain walls.
- Many styles exist: Crown moulding, chair rails, wainscoting, and picture rails each serve a unique decorative purpose.
- Material choice matters: Wood, MDF, polyurethane, and plaster each offer different benefits for durability and aesthetics.
- Proper installation is key: Measuring, cutting, and attaching moulding correctly ensures a clean, professional finish.
- Combine moulding with other design elements: Pairing trim with accent pieces and furniture creates a cohesive room aesthetic.
- Avoid common mistakes: Skipping primer, choosing the wrong scale, and poor measurement can ruin the final result.
Frequently Asked Questions
What is the best type of wall moulding for a small living room?
Slim, simple profiles work best in small rooms. Narrow crown moulding and thin baseboards add elegance without overwhelming the space. Avoid large, ornate profiles that can make the room feel cramped.
Can I install wall moulding myself?
Yes, wall moulding installation is a manageable DIY project. You need basic tools like a miter saw, measuring tape, and a nail gun. Take your time with measurements and cuts for the best results.
What material is easiest to work with for beginners?
Polyurethane moulding is the easiest for beginners. It is lightweight, pre-primed, and easy to cut. MDF is also a good budget-friendly option that works well for painting.
How do I choose the right moulding size for my room?
Match the moulding size to your ceiling height and room size. Taller ceilings can handle larger, more detailed profiles. Smaller rooms look best with slimmer, simpler trim. A good rule of thumb is that the moulding width should be proportional to the wall width.
Should I paint or stain my wall moulding?
It depends on your style. Painting moulding white or cream is the most popular choice. It creates a clean, classic look. Staining moulding works well in rustic or traditional interiors where you want the wood grain to show.
How do I maintain wall moulding over time?
Dust moulding regularly with a soft cloth or duster. Inspect for cracks or gaps once a year and fill them with caulk. Repaint every few years to keep the trim looking fresh and polished.